
Kevin Merchant Photography Articles |
| Astrophotography - Going Down The Rabbit Hole, Part 1 |
|
In the beginning... Every story has a beginning. This one is a bit messy, like many of the paths I have taken in this crazy life of full-time photography. On occasion, I have shot lunar eclipses, with all of the challenges that come with shooting a celestial body - earth rotation, extreme telephoto focal lengths and vibration, focus issues, working in the dark, etc. I wouldn't claim many successes in this category. In 2017, something changed and I started on a path down a rabbit hole - the year of the Great American Eclipse, as it became known in the US. Now, of course, it is a faded memory for most people. Not me, though. I first learned about the eclipse in January of 2017. I had the initial thought that I couldn't go because of art show schedule conflicts in August. Then a (now silly) thought occurred to me - I don't have to spend three or four days in the path in order to shoot it; I just needed to get in the path. Afterall, the eclipse was on a Monday. My show ended on Sunday afternoon. 350 miles of driving? 8 hours? No problem. And so, in April I purchased two different solar filters based on some Internet research. I thought - "I am set, for two different cameras!" One is the Thousand Oaks Optical 77mm SolarLite threaded filter for my Canon EF 70-200mm f/2.8 L IS USM lens. The other is the Marumi 77mm ND10 threaded filter for my Canon EF 100-400mm f/4.5-5.6 L IS II USM lens. As I researched more on photographing eclipses, and doing some test shooting with the filters, I came to realize that at the focal lengths I was considering (400mm and 800mm), the sun was going to move pretty fast in the frame; meaning, I would be constantly adjusting the framing during the eclipse. So, I decided to acquire an inexpensive equatorial tracker for the longer focal length camera/lens combination in early July. At this point, the eclipse was a small blip on the TV news. No big deal! I bought the iOptron SkyGuider Pro model. With the equatorial mount (the more technical term) in hand, I started to realize it was no small learning curve to be able to use it properly. Polar alignment is critical to have accurate tracking. And, most people on the Internet just assume you know how to do it. "Hey, I'm a beginner!" In the northern hemisphere where I am, polar alignment is done using the North Star (Polaris). Finding stars, by definition, means you are working in the dark. Working in the dark is not a surprise, of course, but you do need to be much more organized about where your bits and pieces are for setting things up. It also explains why the more experienced people in this sort of endeavor do as much setup in daylight hours as they can. In a pinch, daytime polar alignment is possible. At least, a rough alignment. This is a very worthwhile technique to have in your backpocket, especially for solar eclipses since you may have to relocate due to weather and clouds - even on the day of the eclipse. Weather happens. Eclipses or not, daytime polar alignment is useful for getting a rough alignment before getting it dialed in after dark. As it turns out, the easy part of doing a daytime polar alignment is downloading a smartphone app that gives you the proper positioning for altitude and azimuth of Polaris. I am using Polar Scope Align Pro (the app also has a bubble level feature useful for leveling the tripod). Somehow, the phone needs to be mounted on the eqatorial mount, pointing in the direction of Polaris. Precise alignment with the declination axis is preferred which means the phone needs to be sitting flat on the mount and parallel to the declination axis of the mount. Sounds simple, right? Unlike just about every other aspect of this endeavor, there is nothing commercially made for the purpose of mounting a smartphone in such a manner. The articles that I read about for this procedure all had some homemade, fabricated means of mounting a smartphone to the mount (usually involving rubber bands to hold the phone). Fabrication details were left to the reader. I was able to fabricate my own phone mounting plate made out of foamcore and hot glue, holding the phone on with rubber bands. Low-tech and not terribly precise, right? But, days before the eclipse, there was no time to do a better job. Let's just say, daytime precision alignment was never going to be acheived with what I fabricated. The equatorial mount I have has an 11 lb. limit. So, you have to be conscious of every ounce/gram being used. My plan was to use a Canon 7D Mark II body, the EF 100-400mm L II zoom lens and a 2x teleconverter for an effective focal length of 1280mm (1.6 x (400 x 2)). Also, I was going to be shooting a timelapse sequence throughout the 2.5 hours of the eclipse, from first contact to fourth contact. This meant that a single battery charge may not get me through the eclipse. But, to cut weight, the battery grip I planned to use had to be eliminated (switching out batteries was not too troublesome). One final weight consideration was eliminating the ball head I planned to use to mount the camera on the tracker. This meant making a last minute purchase of a panning clamp (the Really Right Stuff PC-PRO B) to replace the heavier ball head. Thankfully, that didn't fall under the category of solar eclipse equipment and was available (by now, certain equipment was starting to become scarce). By this time, the eclipse was squarely in the sights of much of the public and approaching a fever pitch; but not impossible to still get equipment. Not wanting to leave anything to chance with the rough daytime polar alignment, I happened across a solution - a small USB enabled CCD camera for deep sky viewing, coupled with software that can give very accurate polar alignment (Polemaster, made by the Chinese company QHYCCD). As it so happens, one of the US distributors is located in Seattle. A call to the brick-and-mortar store revealed they still had several in stock. At this point, it is one week away from the eclipse and so I made the purchase. The manufacturer does not make an adapter to mount the camera to my specific equatorial tracker, but I had reassurance from the store owner that it would work without perfect alignment to the tracker - all I needed was a little Gorilla double sided tape. So, with this, I made the final gear acquisition needed for the eclipse. I had about three nights suitable to practice performing a polar alignment at home before heading into the field. I downloaded and installed the software on my Dell tablet (Windows 10). The procedure is a bit tedious, but works really well (as long as Polaris is visible). The software, however, is less than stellar - it would hang when trying to close it and let's just say the user interface could use some work. This is not a program that will ever get wide distribution (a single purpose use in the very narrow field of astrophotography) and therefore not exactly a lot of motivation to spend time fixing many of its imperfections. But, it did work for getting very accurate polar alignment and for that I am thankful to the developer(s). I have since upgraded to a camera made by iOptron, the iPolar Electronic Polar Scope, which replaces the optical polar scope inside of the tracker - no Gorilla tape needed, no additional assembly required. And, iOptron has made several update releases of it's software for polar alignment. The panning clamp arrived giving me just enough time to perform one solar shooting session with the polar aligned equatorial tracker. The camera, lens, teleconverter, filter and panning clamp balanced perfectly with one counterweight (I did order extras, just in case) and a few magnets to add just enough extra mass. The tracker did a very good job of keeping the sun in center frame, so I was ready to go. I had a Saturday/Sunday art festival before the Monday of the eclipse. The plan that came together was to tear down and pack up as efficiently as possible after the show ended at 5 PM on Sunday. Then unload everything at home and reload the truck with eclipse gear. We departed the house at 8:22 PM Sunday evening and headed over Snoqualmie Pass to the Tri-City area for a meet up with a friend about midnight. From Richland, with a full tank of gas in Prosser, we were a caravan on the way to our selected site. We arrived just before 4 AM. With a small snafu, we had to relocate to another spot up the road about 6 AM. While I lost my polar alignment with the new-fangled device, I was able to get a rough polar alignment as I had practiced. As it turns out, it was rough but close enough that I only occasionally had to adjust the camera through the eclipse, but, otherwise the tracker freed me to man several other cameras that I had set up, including assisting with one that my wife was operating. At 9:07:55 AM, we started recording First Contact. At 10:20:34 we had Second Contact and at 10:23:57 we had Third Contact. At 11:43:06, the eclipse ended in our location. Traffic? Crowds? Well, we did not encounter any traffic in the wee hours of the morning on our trip down. Although, there were a number of places where we saw cars pulled off the road for the night, all long before we arrived at our destination. And, we did not encounter anyone else on our chosen road for the eclipse. In our location, we had the place completely to ourselves. We kept pinching ourselves as we just could not believe it. We were braced for and expecting Armageddon. Extra water. Extra gas. Several days of food. Camping gear for an overnight stay. None of that was really needed. We left about 2 PM for home, and, yes, there was traffic but nothing like we were expecting. In fact the worst traffic was on Interstate 90, east of Snoqualmie Pass where construction had the highway closed down to a single lane (Really?!? At least, the road was not closed for rock blasting; they saved that for Tuesday night). We arrived home at 12:19 AM, Tuesday morning. Where did we end up going? The nearest town was Monument. Our exact coordinates - 44° 43' 51.53" N 119° 25' 31.96" W, Oregon. It did get dark. It did cool down. It was awesome! We did have trouble focusing on the photography, especially during totality. I for one, didn't get any sleep. I would totally do it again. I will continue this saga in the next installment. |
|
August 30, 2017 |
 |
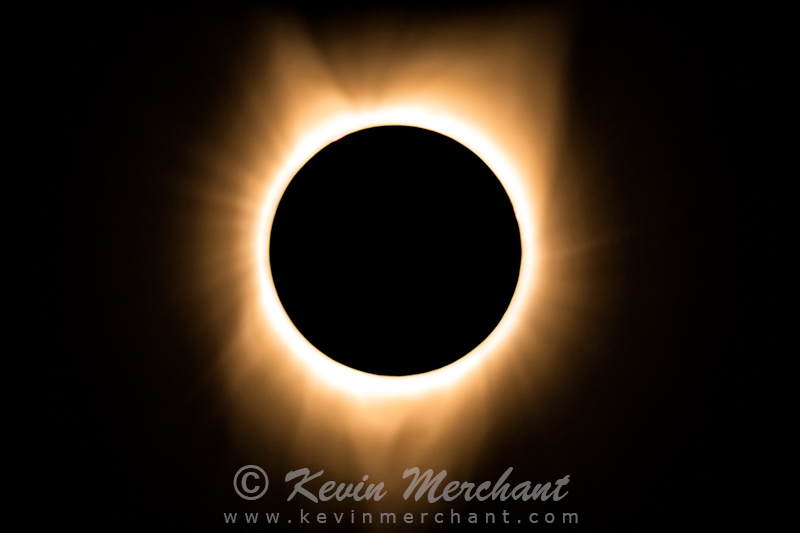
| SK_082117_7D_II-1056 - 2017 Total Solar Eclipse, 44° 43' 51.53" N 119° 25' 31.96" W, Oregon |
 |
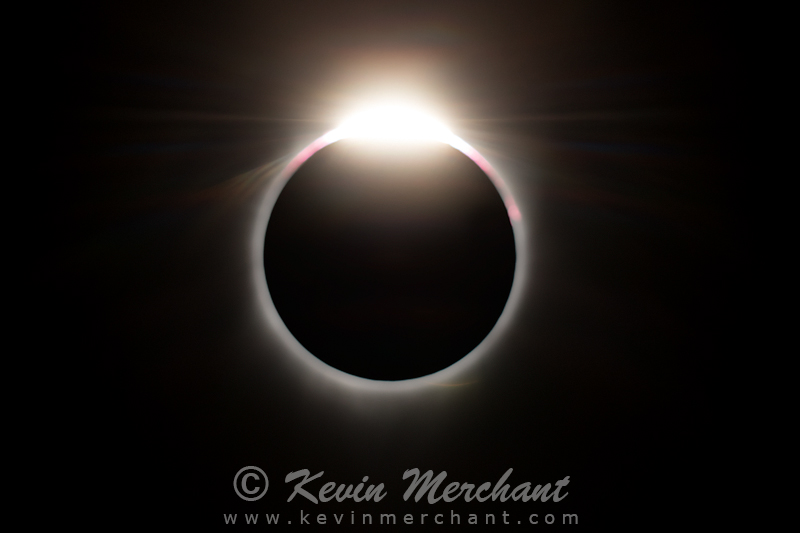
| SK_082117_7D_II-1095 - 2017 Total Solar Eclipse, 44° 43' 51.53" N 119° 25' 31.96" W, Oregon |
 |
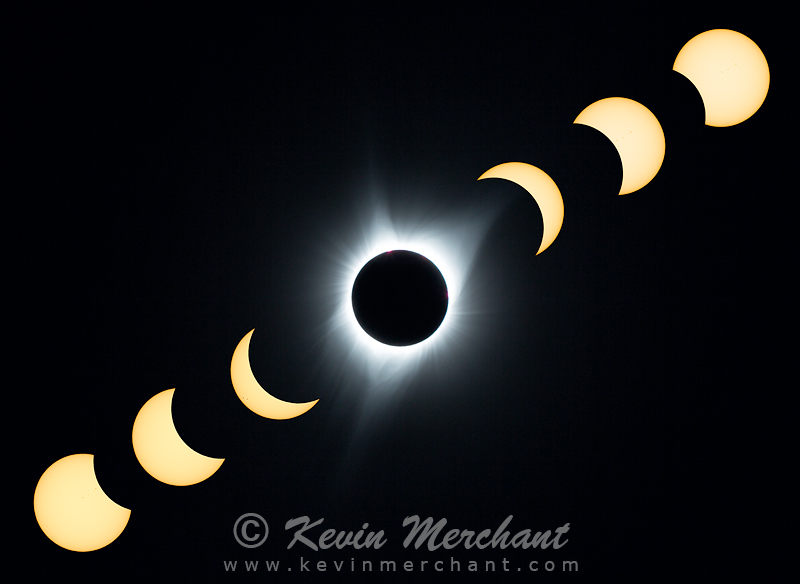
| SK_082117_7D_II-537 - 2017 Total Solar Eclipse, 44° 43' 51.53" N 119° 25' 31.96" W, Oregon |
| © KEVIN MERCHANT PHOTOGRAPHY |
|
All photographs appearing on this site are Copyrighted
property of Kevin Merchant Photography and are protected under United States and
international copyright laws and have been registered with the U.S. Copyright Office. Contact Kevin Merchant Photography for licensing terms of all photographs appearing on this site. |